Unity Cave Population Tool
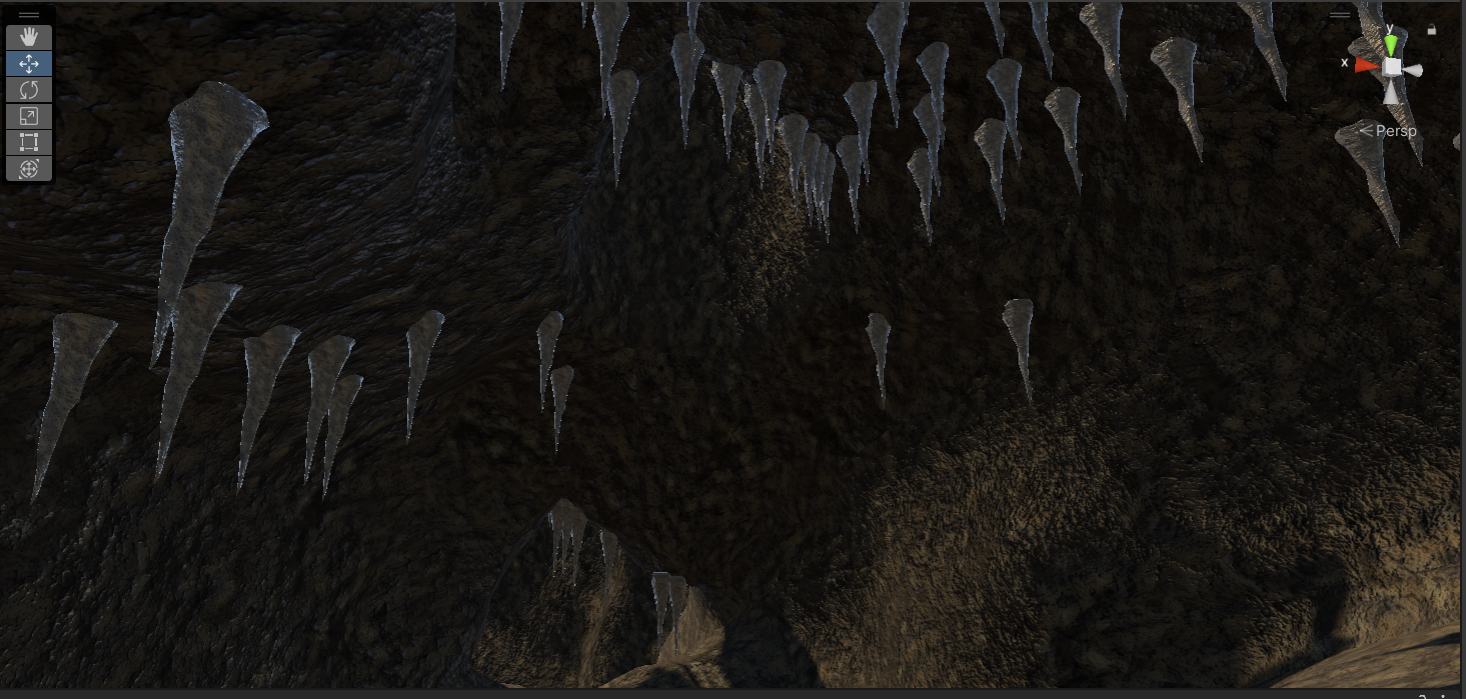
While working on Project Nautilus, a workflow problem was brought up to me early on in the semester. On my team, I have settled in as a Tools & Pipeline Programmer, and while analyzing different pipeline structures on my team, one of the Artists on my team informed me of a task that has particularly been a timesink for them. As our game is an underwater adventure game, we have had to place a lot of objects within large cave spaces. The most notable of these are floor rocks and stalagtites that live on the cave ceiling. Conrad, the artist who brought me this issue, let me know that placing the rocks within the cave took them over 8 hours to do by hand. They also mentioned that they have tried using public tools to paint the rocks in the scenes, however they struggled painting in closed environments like caves. Taking this problem, I decided to start development on a Cave Population tool. The end goal of this tool would be to input the cave prefab, and randomly place a prefab randomly about either the floor or ceiling. This would eliminate a lot of the time wasted, as the artists could spend their time tweaking, adjusting, and deleting rocks that were generated, rather than place every rock into the cave by hand.
When trying to devise a method to place the rocks, I decided that the best plan would be to analyze the mesh data for the cave. This would give me access to all of the verticies of the mesh, as well as the normals of each point. This data would be very useful to me because if I spawned prefabs upon random vertex points, to the player, they would just look like random points. Therefore, the list of verticies within the mesh essentially act like a large list of random points for me. The next logical problem would be distinguising the floor verticies from the ceiling verticies. Thinking about this problem led my mind to my knowledge of Vector math, particularly the Dot product of two vectors. I knew that if I took the Dot product of the vertex normal with the World Up vector, then that would give me a number that would represent which direction the vertex is facing. If the result was positive, then the vertex was on the floor. If it was negative, then it was on the ceiling. If it came out to be 0, then it was perpendicular, or lived on the XZ plane, which we wouldn’t want to spawn object on anyways. Futhering this, I also implemented a tolerance for the horizontal where objects wouldn’t spawn a certain amount above or below the horizontal. If we just used the Dot product, then any vector slightly pointing up could spawn a floor rock, when in reality, we wouldn’t consider that to be on the floor. So by using a tolerance value, I was able to have the user adjust the parameters to what they need.
Working on this, I implemented a visualization option within Unity, so that you could see the verticies and normals within the editor, and whether my tool considers them to be on the ceiling or on the floor.
Here is the code where I check if an object is on the floor:
if (checkBound(mesh.vertices[i]) && ShouldGen() && Vector3.Dot(mesh.normals[i], Vector3.up) < -tolerance)
    {
		...
	}
The ShouldGen function is where I determine whether the point should be generated by RNG. The CheckBound function, is another feature that I implemented into this tool! After presenting initial versions to my artists, they expressed that it could be useful to generate objects just within a specific area. My solution was to implement a bounding sphere option. If they selected this option, a sphere would generate within the world, that the artists could fully manipulate. If they place the area that they want generated inside of this sphere, then only points within this sphere would generate. Implementing this was simple enough, as you only have to check if any vertex is less than the radius of the sphere away from it’s center.
After completing development of my tool, I wanted to document my tool, so that my fellow developers could understand and use the tool, without me standing behind them over their shoulder. Therefore, I created a Tool Document for my team to use. It covers every option that my tool has, as well as pictures and more information of the workings of the tool. You can find the document I made here: Guide
If you would like to see my code, here is a link to my Tool Script: Code